とりあえずサンプルコードで動かしてみる
今回は ArduinoIDE を用いて実験をします。 M5Stack 公式から出されている UiFlow-IDE を用いても良いのですが、アイコンが使いづらい上処理も遅いので好きじゃありません。 ぱぱっと ArduinoIDE のスケッチ例から IMU.ino を選択し実行。
1// define must ahead #include <M5Stack.h>
2#define M5STACK_MPU6886
3// #define M5STACK_MPU9250
4// #define M5STACK_MPU6050
5// #define M5STACK_200Q
6
7#include <M5Stack.h>
8
9float accX = 0.0F;
10float accY = 0.0F;
11float accZ = 0.0F;
12
13float gyroX = 0.0F;
14float gyroY = 0.0F;
15float gyroZ = 0.0F;
16
17float pitch = 0.0F;
18float roll  = 0.0F;
19float yaw   = 0.0F;
20
21float temp = 0.0F;
22
23// the setup routine runs once when M5Stack starts up
24void setup(){
25
26  // Initialize the M5Stack object
27  M5.begin();
28  /*
29    Power chip connected to gpio21, gpio22, I2C device
30    Set battery charging voltage and current
31    If used battery, please call this function in your project
32  */
33  M5.Power.begin();
34
35  M5.IMU.Init();
36
37  M5.Lcd.fillScreen(BLACK);
38  M5.Lcd.setTextColor(GREEN , BLACK);
39  M5.Lcd.setTextSize(2);
40}
41
42// the loop routine runs over and over again forever
43void loop() {
44    // put your main code here, to run repeatedly:
45  M5.IMU.getGyroData(&gyroX,&gyroY,&gyroZ);
46  M5.IMU.getAccelData(&accX,&accY,&accZ);
47  M5.IMU.getAhrsData(&pitch,&roll,&yaw);
48  M5.IMU.getTempData(&temp);
49
50  M5.Lcd.setCursor(0, 20);
51  M5.Lcd.printf("%6.2f  %6.2f  %6.2f      ", gyroX, gyroY, gyroZ);
52  M5.Lcd.setCursor(220, 42);
53  M5.Lcd.print(" o/s");
54  M5.Lcd.setCursor(0, 65);
55  M5.Lcd.printf(" %5.2f   %5.2f   %5.2f   ", accX, accY, accZ);
56  M5.Lcd.setCursor(220, 87);
57  M5.Lcd.print(" G");
58  M5.Lcd.setCursor(0, 110);
59  M5.Lcd.printf(" %5.2f   %5.2f   %5.2f   ", pitch, roll, yaw);
60  M5.Lcd.setCursor(220, 132);
61  M5.Lcd.print(" degree");
62  M5.Lcd.setCursor(0, 155);
63  M5.Lcd.printf("Temperature : %.2f C", temp);
64
65  delay(1);
66}
一応、値を見ることができました。

しかしこの degree の yaw 角ドリフトがある上に、回転する速度によって変化する値が結構変わってしまう、、、
yaw 角を求めるプログラムを作る
yaw 角以外の値はぱっと見正しそうなので今回は yaw 角だけ求めるプログラムを自分で作ることにしました。
1#define M5STACK_MPU6886
2#define CALIBCOUNT 10000
3
4#include <M5Stack.h>
5
6float accX = 0.0F;
7float accY = 0.0F;
8float accZ = 0.0F;
9
10float gyroX = 0.0F;
11float gyroY = 0.0F;
12float gyroZ = 0.0F;
13
14float yaw   = 0.0F;
15
16float gyroOffsetZ = 0.0;
17
18float preTime = 0.0F;
19float dt = 0.0F;
20
21float pregz = 0.0F;
22float degree = 0;
23
24int cnt = 0;
25
26void calibration()
27{
28  delay(1000);
29  M5.Lcd.printf("...");
30  float gyroSumZ = 0;
31  int count = CALIBCOUNT;
32  for (int i = 0; i < count; i++) {
33    M5.update();
34
35    float gyroZ;
36    M5.IMU.getGyroData(&gyroX, &gyroY, &gyroZ);
37
38    gyroSumZ += gyroZ;
39    if (M5.BtnB.wasPressed())
40    {
41      M5.Lcd.clear();
42      M5.Lcd.setCursor(140, 120);
43      M5.Lcd.printf("Exit");
44      delay(500);
45      return;
46    }
47  }
48  gyroOffsetZ = gyroSumZ / count - 0.02;
49  M5.Lcd.clear();
50  M5.Lcd.setCursor(140, 120);
51  M5.Lcd.printf("Done");
52  delay(500);
53}
54
55void GetGyro()
56{
57  M5.IMU.getGyroData(&gyroX, &gyroY, &gyroZ);
58  M5.IMU.getAccelData(&accX, &accY, &accZ);
59
60  gyroZ -= gyroOffsetZ;
61
62  dt = (micros() - preTime) / 1000000;
63  preTime = micros();
64
65  yaw -= (pregz + gyroZ) * dt / 2;
66  pregz = gyroZ;
67
68  if(yaw > 180)
69  {
70    yaw -= 360;
71  }
72  else if(yaw < -180)
73  {
74    yaw += 360;
75  }
76  delay(10);
77}
78
79void Button()
80{
81  M5.update();
82  if (M5.BtnA.wasPressed())
83  {
84    cnt--;
85    M5.Lcd.clear();
86  }
87
88  if (M5.BtnC.wasPressed())
89  {
90    cnt++;
91    M5.Lcd.clear();
92  }
93}
94
95void ResetGyro()
96{
97  gyroZ = 0.0;
98  pregz = 0.0;
99  yaw = 0.0;
100  M5.Lcd.clear();
101  M5.Lcd.setCursor(120, 120);
102  M5.Lcd.printf("RESET");
103  delay(500);
104  M5.Lcd.clear();
105}
106
107void Main()
108{
109  M5.Lcd.clear();
110  while (true)
111  {
112    M5.update();
113    M5.Lcd.fillCircle(160 + 80 * cos(degree), 120 + 80 * sin(degree), 10, BLACK);
114    M5.Lcd.setCursor(160, 0);
115    degree = (yaw - 90) / (180 / PI);
116    GetGyro();
117    M5.Lcd.drawCircle(160, 120, 80, WHITE);
118    M5.Lcd.fillCircle(160 + 80 * cos(degree), 120 + 80 * sin(degree), 10, GREEN);
119    M5.Lcd.printf("%4.0f", yaw);
120    if (M5.BtnB.wasPressed())
121    {
122      M5.Lcd.clear();
123      break;
124    }
125  }
126}
127
128void setup() {
129
130  M5.begin();
131
132
133  M5.Power.begin();
134
135  M5.IMU.Init();
136
137  M5.Lcd.fillScreen(BLACK);
138  M5.Lcd.setTextColor(WHITE , BLACK);
139  M5.Lcd.setTextSize(2);
140  delay(1);
141}
142
143
144void loop() {
145  Button();
146
147  switch (cnt)
148  {
149    case 0:
150      M5.Lcd.setCursor(140, 120);
151      M5.Lcd.printf("Main");
152      if (M5.BtnB.wasPressed())
153      {
154        Main();
155      }
156      break;
157    case 1:
158      M5.Lcd.setCursor(90, 120);
159      M5.Lcd.printf("Calibration");
160      if (M5.BtnB.wasPressed())
161      {
162        calibration();
163      }
164      break;
165    case 2:
166      M5.Lcd.setCursor(100, 120);
167      M5.Lcd.printf("ResetGyro");
168      if (M5.BtnB.wasPressed())
169      {
170        ResetGyro();
171      }
172      break;
173    default:
174      cnt = 0;
175      break;
176  }
177}
プログラムが長くなってしまいました 💦 時間があったので余計な物まで追加しちゃってます。キャリブレーションと初期方向のリセット、実際の yaw 角の変化の可視化を同一プログラム内でできるようにしました。
キャリブレーションをする関数 Calibration
Calibration では一番上で define した数 CALIBCOUNT 分だけデータを取りその値を平均した値をオフセット値に代入するという関数になっています。キャリブレーション中は IMU を動かさないというのが前提です。
yaw 角の角度変化を求める関数 GetGyro
GetGyro では縦軸角速度(deg/s)、横軸時間(s)からなるグラフの面積を積算することで角度変化を求めるということをしています。(積分には台形による積算の方法を用いています。詳しくはこちらのサイトを参考にさせていただきました)
https://garchiving.com/angular-from-angular-acceleration/ 実際に yaw に入る値は-180~180 になるようにしています。
ジャイロの方向を初期化する関数 ResetGyro
ResetGyro は yaw 角を求めるために必要なパラメーターと yaw 角自体を初期化するという簡単なものです。
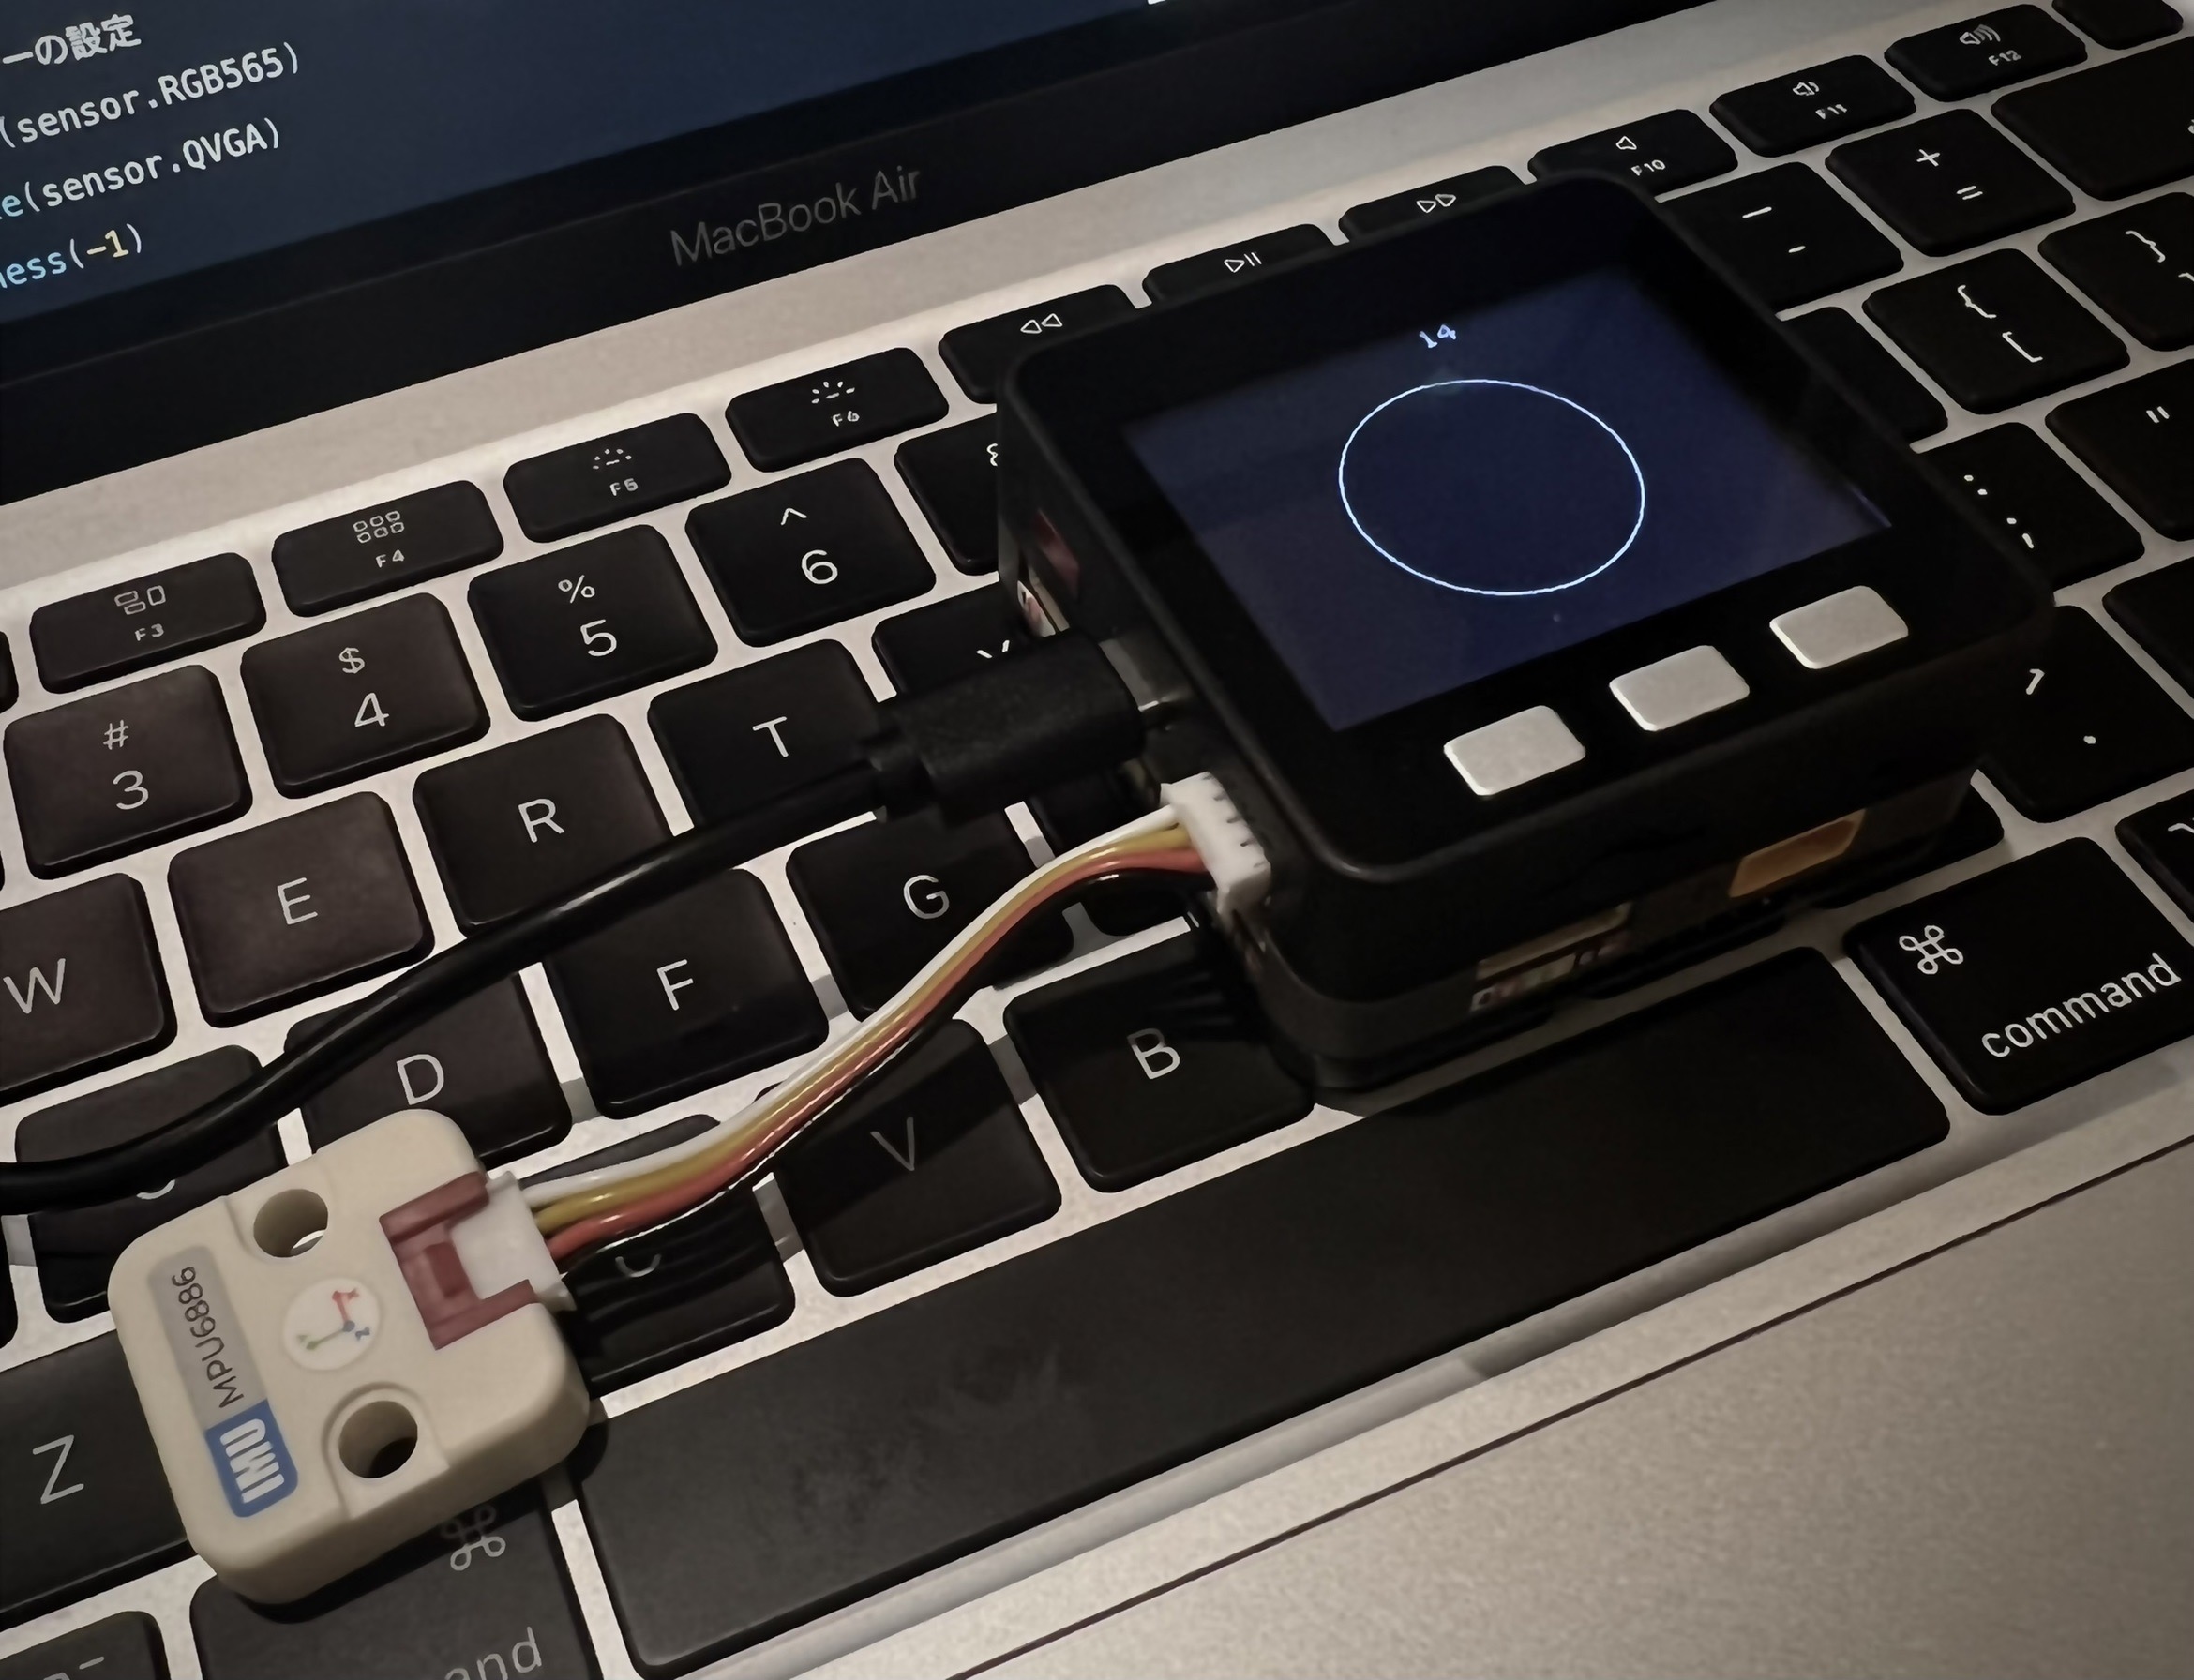
最後に、求めた yaw 角の角度変化を可視化する関数 Main
今回最終的にやりたかったことが角度変化を可視化することであったので Main という名をつけました。 この関数では実際に GetGyro で求めた値を円上にプロットすることで可視化するというものです。円上の点の座標は半径を x、θ を yaw 角の角度変化とすると(xcosθ,xsinθ)となります。なので最終的に半径 x の円を画面中央に描画し(円の中心 x 座標+(xcosθ),円の中心 y 座標+(xsinθ))に点を描画することで可視化できました。
しかし一度描画した点は自動的に消えてはくれないので、毎回次のループでその点を黒く塗るということをおこなっています。そのせいで表示と消すという動きを繰り返すため点が点滅してしまい少し見づらいです、、、何かいい方法はないのでしょうか、、